


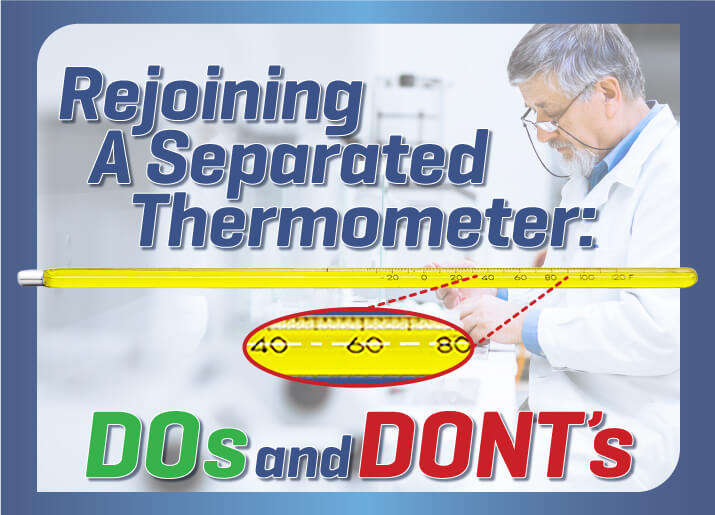
Rejoining Separated Fluid in Thermometers
If you work in a materials testing lab, you've most likely experienced failure of a liquid-in-glass (LiG) lab thermometer due to a separated column of mercury or indicating fluid. Separation can happen during shipping or from improper storage or use. If the fluid in the column is separated, all subsequent readings will be inaccurate. This common occurrence is not normally a reason to return or discard the thermometer. Most of the time, the separated fluid column can be rejoined by cautiously following certain steps, allowing the thermometer to be returned to service.

This blog post will explore common practices developed by others to reunite a separated column in both mercury-in-glass thermometers and spirit-filled thermometers.
Practicing proper vertical storage of LiG thermometers in a thermometer storage rack minimizes column separation issues, prevents breakage, and keeps the devices organiznd out of the way.
6 Do's and Don'ts for Separated Mercury-Filled Thermometers
Mercury is a hazardous material and requires greater care and safety precautions than non-mercury LiG thermometers when using or maintaining.

#1: Attempting to rejoin a separated column on your own
- Do be experienced and careful if you attempt this process. Rejoining a separated mercury column is not an “I’ll give it a try” endeavor. Mercury is a hazardous material and breakage of a glass thermometer is considered a mercury spill requiring strict procedures to prevent human exposure. It requires expertise and skill, keeping safety a priority.
- Don't hesitate to ask for assistance. If you have not done this procedure before, get in touch with the manufacturer or a calibration lab experienced in the process for guidance and help. Check out the links in the More Information section at the end of this blog.
#2: Remember that mercury is a hazardous material!
- Do exercise extreme care and caution when rejoining a separated column in a mercury thermometer.
- Don't forget to review prescribed safety requirements and to wear specified safety equipment.
#3: Remember the regulations and safety protocols
- Do follow regulatory agency and internal laboratory policies and safety procedures fully to prevent breakage and avoid a hazardous mercury spill. If a spill occurs, notify your safety officer immediately.
- Don't attempt these procedures on a mercury thermometer without having a complete mercury spill kit on hand.
#4: Cooling is the preferred method
Except for deep immersion thermometers, this method can be used with most mercury thermometers to reunite a separated column.
- Do try the cooling method first. It is considered the safest way to rejoin the separated mercury, and can be performed using the following easy-to-find items:
- Solid Carbon Dioxide (CO2), also known as dry ice
- Alcohol or Acetone
- Gloves and Safety Goggles
- Don't touch the bulb when the cooling method has been completed until it has warmed enough to allow the mercury to flow from the bulb into the capillary.
The purpose of this procedure is to rejoin the separations and ensure that the gas remains above the mercury. Holding the thermometer upright, slowly and gradually immerse only the bulb of the instrument into a solution of dry ice and alcohol contained in a metal beaker or other vertical container.
During this gradual insertion, the mercury should begin to solidify. Do not immerse the stem or column of the thermometer into the cooling solution or allow the mercury to freeze as that can cause the bulb to fracture.
Move the bulb in and out of the solution many times to slow down and control the cooling action. When all the separated portions have been brought into the bulb, take the thermometer out of the container and swing it in a short arc to force the mercury into the bulb.
Placing the thermometer upright in an upright thermometer storage rack as it returns to room temperature keeps the nitrogen gas on top of the mercury. Storing thermometers properly when not in use reduces the likelihood of the mercury column separating again.
#5: Using the Heating Method for rejoining
- Do use this method only for thermometers with a maximum range of 260°C (500°F), and with expansion chambers1 able to accommodate the separation and a portion of the main column.
- 1The expansion chamber is at the top of the capillary in a LiG thermometer. The chamber prevents the buildup of pressure if the maximum temperature is exceeded and the liquid rises past the top of the scale.
- Don't ever heat the bulb with an open flame or fill the expansion chamber more than two-thirds full, or use the heat method to rejoin columns in thermometers with a range in excess of 260°C (500°F). Any of these could damage the thermometer or cause the bulb to burst.
In addition to protective gloves, goggles, and other necessary safety gear, a large beaker partly filled with a liquid heated below its flashpoint, but never above 260°C (500°F) is required.
Immerse the bulb and stem into the liquid and gently stir with the thermometer until the separation and part of the main column just begin to enter the expansion chamber. The expansion chamber should never be more than two-thirds full.
Once the fluid is in the chamber, remove the thermometer from the beaker and hold it upright. Gently tap it vertically into the palm of your gloved hand to reunite the column. Allow the thermometer to cool slowly. Again, keeping unused thermometers in a storage rack will help prevent future separation.
Note: An alternative to the beaker is to use a temperature-regulated liquid bath.
#6: Gas bubbles in thermometers with a contraction chamber
Mercury thermometers with a contraction chamber2 can be prone to separations and bubbles of gas. Rough handling during shipping or frequent jarring of the instrument in the lab can cause gas bubbles in the bulb.
Some LiG thermometers with scale ranges that begin above ambient temperatures have a contraction chamber located just below the main scale of the device. This enlargement in the capillary prevents excess fluid from entering the bulb at lower temperatures and shortens the distance the fluid must travel when measuring higher temperatures.
- Do examine the tip of the bulb regularly for any gas bubbles.
- Don't tap the thermometer bulb on a hard surface. Doing so can cause the gas to break up into many smaller bubbles and worsen the situation.
To resolve the issue, use the cooling method described above to cool a portion of the bulb until a large bubble of gas enters it.
Remove the thermometer from the cooling container, and hold it upright with the bulb side up, and begin to gently tap it against the palm of your hand. As gas is lighter than mercury, the gas bubble will rise up the length of the bulb. Invert and tilt the thermometer so it now stems up and roll it around to allow the gas bubble to come into contact with the bulb surface.
The large bubble will pick up the other smaller gas particles as they come in contact. Continue rolling the thermometer in this manner until all smaller gas particles have been picked up. Once all the bubbles are absorbed, continue to follow the Cooling Method described above to get the gas positioned above the mercury in the thermometer. Be careful to let the bulb warm to the point that the mercury is no longer solid before touching it.
Finally, keep in mind that there are federal, state, and local ordinances that control mercury instruments. Regulations are constantly changing and companies may not be allowed to ship mercury thermometers to some areas.
Tips for Separated Non-Mercury Filled Thermometers

Fluid column separations can occur just as easily in non-mercury or spirit-filled LiG thermometers. Although rejoining separations in these instruments don’t pose as great a risk, the process still requires experience and expertise.
- Tip #1: A simple and safe method is using a centrifuge to draw the liquid down the capillary. The centrifuge cup should be deep enough so that centrifugal force is below the liquid column. If the centrifugal force is not below the column, the column will split and only force a portion of the liquid down, with the rest migrating up into the expansion chamber. Cotton padding should be placed in the bottom of the cup to prevent damage to the bulb. Place the thermometer bulb down in the cup and turn on the centrifuge to quickly force all the liquid through the separation – this should take just a few seconds.
- Tip #2: If no centrifuge is available, another option is to hold the thermometer upright and gently tap the stem of the thermometer vertically against the palm of your hand. As you are tapping, keep watching the liquid above the separation – it should break away from the capillary wall and run down to join the main column. Continue the tapping action and observation until all the liquid has rejoined the main column. If liquid did make its way into the expansion chamber, continue this process until all the liquid is reunited.
More Information:
You can find additional information on these temperature devices at AASHTO resource, through its Anatomy of a Liquid-in-Glass Thermometer or in NIST’s Special Publication 1088: Maintenance, Validation, and Recalibration of Liquid-in-Glass Thermometers.
Gilson Is Here to Help
Contact our testing experts for more information or to discuss your testing application.
Testing Resources
Standard Test Methods, Specifications, and Practices
Individual test methods and specifications referenced in our product descriptions, blog articles, and videos are available for review or purchase from the professional organizations noted.
- ASTM International (American Society for Testing and Materials)
- AASHTO (American Association of State Highway and Transportation Officials)
- ACI (American Concrete Institute)
- State DOTs (Departments of Transportation)
- ISO (International Organization for Standardization)
- BS (British Standards)
- EN (European Standards)