


How to Maintain Your Gilson Testing Screen
The iconic Gilson Testing Screen was introduced in 1939 to meet one aggregate producer's demand for a more accurate and efficient method to monitor and control product quality. The Testing Screen uses a larger representative sample, which is more easily collected, prepared, and processed for accurate particle size gradations. Aggregate, concrete, and asphalt suppliers, along with engineering and testing laboratories, soon saw that this simple and rugged device made quality control of coarse aggregates a much more efficient process, and it is an ongoing success story for our industry.
The Testing Screen is renowned for its effectiveness and longevity, and it lasts for decades with reasonable care. This article discusses how to access and employ Gilson resources to maximize the device's service life and ensure optimum performance.
Accessing Gilson Resources
Gilson has over 80 years of cumulative knowledge of every aspect of our Testing Screens. A visit to our website helps you solve any issues with maintenance, diagnostics, and repairs. Our resources and references are available for review and download. You can also contact Gilson's experienced Technical Support team for help, or our customer service staff to order repair parts.
Operating Manuals
Operating Manuals for the Testing Screen models include detailed information, drawings, and parts lists needed when servicing the Testing Screens. We encourage you to download and review the manual for the TS-1 through TS-3 models. There is a separate manual for the TS-4 Silent Testing Screen. Download using the links provided on the product page of our website.
How-To Videos
How-to videos demonstrate and clarify the instructions and procedures for servicing Gilson Testing Screens. This article includes links to videos, and more can be viewed or downloaded from our website or YouTube channel.
Gilson Insights Blogs
Gilson Blog posts in-depth articles monthly about interesting industry topics that affect our readers.
Gilson Email Newsletter
Our monthly email newsletter "Great Shakes" delivers up-to-date information to subscribers across the full range of our products, our trade show schedule, and technical society activities.
The operating manuals and video links contain Gilson's recommendations and specific information for identifying, accessing, and servicing each part. These resources should be reviewed in advance and kept handy for quick reference. There are also previous Gilson Insight articles that contain helpful information:
- Simple Steps to Preserve & Extend Service Life of Costly Equipment
- How To Get Optimal Performance with Gilson Screen Shakers
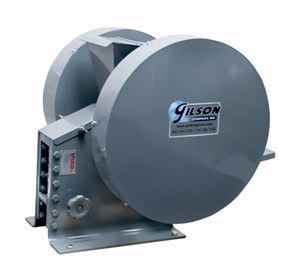
Testing Screen Models
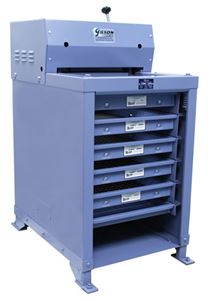
- TS-1 is Gilson's most popular Testing Screen and features a hydraulic clamping system to secure the screen trays. The TS-1 has six tray slots to hold five screen trays plus a dustpan and operates on 115V, 60Hz electrical supplies. A TS-1F model operates on 230V, 50Hz supplies.
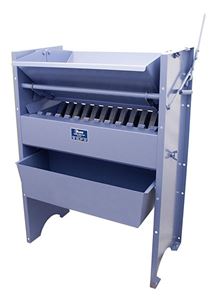
- TS-2 is an older model and is the "original" Testing Screen. Like the TS-1, the TS-2 holds five screen trays plus a dustpan in six tray slots, but the trays are secured using two manually-operated threaded handles. The TS-2 operates on 115V, 60Hz electrical supplies. The TS-2F operates on 230V, 50Hz power supplies.
- TS-3 is similar to TS-1 with its hydraulic tray clamping system but features seven tray slots to accommodate an extra screen tray. Electrical operation is on 115V, 60Hz power. TS-3F operates on 230V, 50Hz electrical supplies.
- TS-4 is our newest Testing Screen, designed for convenience and to minimize noise and nuisance dust in the laboratory. The Silent Testing Screen has all the features of the TS-3, plus a sound-damping frame, heavy-duty latching door, and integrated digital timer/controller for efficient operation and repeatable accuracy. Although most systems are the same as the standard Testing Screens, the TS-4 is supplied with its own operating manual.
Installation & Leveling
The Testing Screen should be located in a space with adequate access and secured to a rigid floor system. The machine must be leveled to ensure its best performance and safest operation. Adding an elevated concrete pad as a base improves ergonomic access for tray and sample handling and simplifies housekeeping.
See the operating manual for complete details on locating, securing, leveling, and connecting the Testing Screen. Dimensions for a floor-mounting template are included. A video, Installing Your Gilson Testing Screen, shows helpful and easy-to-follow steps on locating, securing, and leveling the machine.
Preventive Maintenance
Scheduled lubrication of key points and frequent condition checks of clamping and drive system parts ensures proper operation and minimal downtime for your Testing Screen. Always disconnect the Testing Screen from its power source before performing any maintenance or repair procedure!
Daily housekeeping is an easy but essential preventive maintenance task. Deposits of dust, sand, rock chips, and other debris are inevitable when using the Testing Screen and shorten the life of bearings and bushings in virtually any mechanism. Cleaning the machine as part of every service interval mentioned below promotes extended life and better performance. It allows a quick visual inspection for oil and grease leaks and worn or broken parts. Gilson recommends using a shop vac for quick clean-up after every use, but a manual cleaning with a brush or whisk broom is also effective.
Daily
- Lubricate wrist pin assemblies through the grease fittings at the lower end of the connecting rods using high-quality chassis or bearing grease.
- Check for visible oil leaks, loose or damaged parts on the machine, and damage to the electrical cord.
- Check the condition of screen trays and wire cloth.
Weekly
- Lubricate upper connecting rod bearings through the grease fittings using high-quality chassis or bearing grease.
- For TS-2 only, lubricate the lower threaded blocks.
Monthly
- Remove the top and side covers from the Testing Screen
- Check for signs of oil leaks around the hydraulic pump and hose fittings and correct as needed.
- Check the V-belt for tension, alignment, and condition. (Video)
- Clean the under-hood area before removing the hydraulic pump cover.
- Check hydraulic oil level in pump reservoir. (Video)
- LLubricate upper and lower grease fittings on the connecting rods with high-quality chassis or bearing grease.
Semi-Annually
- Check the clamp rod assemblies for excessive play (Video).
- Inspect hydraulic cylinders for wear and leakage (Video).
- Drain & replace hydraulic pump oil if needed (Video).
- Inspect corner springs and vibrating assembly parts for damage.
- Inspect the outer case and frame for damage.
Diagnostics and Troubleshooting
Gilson builds Testing Screens to be rugged and reliable, but like any mechanical device, they require adjustments for the best performance, and some parts wear or fail. Each issue listed below is covered in detail in the operating manual, and links to helpful videos are noted.
Drive System
The drive system consists of the mechanism and parts that drive the vertical oscillating motion of the screen trays: the electric motor, pulleys, belts, connecting rods, and main shaft.
- Sample Material Shifts on Screen Surfaces or Collects in One Area
- Level the Testing Screen, following the steps described in the manual. (Video)
- For a newer Testing Screen, run the machine empty for 30 minutes or so.
- Tighten floor mounting bolts on the side to which the material is moving. Loosen bolts on the opposite side slightly.
- Check for bent flanges on the screen trays or material trapped between tray slots.
- Check guide bearings, clamp rods, and connecting rods for wear.
- Poor Fraction Separation
- Review guidelines in the operating manual and ASTM C136/AASHTO T 27 for sample loads on screen trays.
- Test the sample in two or more batches if screen tray loads are excessive.
- Increase testing times.
- Position an intermediate-size screen tray to relieve an overloaded fraction.
- Check the machine for worn, broken, or out-of-adjustment components.
- Noisy Operation or Knocking
- Sluggish Operation
- Review sample volume and weight and adjust for overloaded conditions if necessary.
- Check the electrical supply for proper voltage.
- Check V-belt tension, alignment, and condition. (Video)
- Check motor operation and electrical connections.
- The Machine Does Not Start or Shuts Off
- Check circuit breakers for the Testing Screen switch and electrical supply.
- Check the Testing Screen for obstructions or debris blocking operation.
- Check for sample overload conditions.
Clamping System
The screen tray clamping system includes the low-pressure hydraulic pump, hydraulic hoses and pistons, clamp rod assemblies, and seals. For the TS-2 and TS-2F models only, the clamping system is operated manually with threaded clamp rods instead of hydraulic pressure.
- Hydraulic Clamping Pressure Cannot be Maintained
- Check hydraulic fluid level. (Video)
- Check for leaks at the hydraulic pump, hose fittings, and cylinders.
- Refer to the "Hydraulic Pump Troubleshooting" section in the Operating Manual to diagnose pump issues.
- Hydraulic Pump Maintenance and Repair
- Hydraulic Cylinder Inspection and Repair
- Hydraulic Clamp Rod Inspection and Repair
- Inspecting the hydraulic clamp rod assembly. (Video)
Screen Trays
- Noisy Operation
- Check trays for bent flanges and loose tray bolts or clamps.
- Inaccurate Test Results
- Check for damaged, stretched, or sagging wire mesh.
- Review guidelines in the operating manual and ASTM C136/AASHTO T 27 for sample loads on screen trays.
- Replacing the wire mesh in Testing Screen trays. (Video)
References for Testing Screen Operation and Maintenance
The Operating Manual and related videos are the primary sources of information for using and maintaining your Testing Screen. A link to a Testing Screen maintenance schedule form is also provided. Other resources include relevant Gilson Insight blog articles, a recommended list of spare parts to keep on-hand, and a link to machine maintenance software to consider.
ASTM and AASHTO Standard Test Methods describe how to obtain, prepare, and test the mineral aggregate samples that the Testing Screen is primarily used for.
There are other particle sizing applications for these rugged units such as coal, ores, wood chips, and more that have their own standards for testing, but maintenance requirements remain the same for the Testing Screen.
Operating Manuals
Videos
- Installing the Testing Screen
- Leveling the Testing Screen
- Testing Screen Maintenance
- Inspecting Connecting Rod Bearings
- V-Belt Adjustment or Replacement
- Checking Hydraulic Oil
- Draining & Refilling Fluid in the Hydraulic Pump
- Rebuilding the Testing Screen Hydraulic Pump
- Hydraulic Pump Replacement
- Inspecting the Hydraulic Cylinder Assembly
- Replacing Hydraulic Cylinder O-Rings
- Inspecting the Hydraulic Clamp Rod Assembly
- Replacing Screen Tray Wire Mesh
Standard Test Methods
- ASTM C136
- AASHTO T 27
Gilson Insight Blogs
- Simple Steps to Preserve & Extend Service Life of Costly Equipment
- How To Get Optimal Performance with Gilson Screen Shakers
Recommended Parts Inventory
The chart below shows Gilson's recommendations for a spare parts inventory to minimize potential downtime caused by common Testing-Screen issues. Gilson stocks a complete inventory of all Testing Screen replacement parts for immediate delivery.
| Part Description | Part Description | Notes |
|---|---|---|
| Hydraulic Oil, ½ pint Can | RPTS-OIL | Medium viscosity hydraulic fluid |
| Hydraulic Hose Kit | RPTS-1HOSE | Includes two 20in hydraulic hoses w/fittings |
| Hydraulic Cylinder Quad Ring Seal Set (2) | RPTS-KEY5 | Parts for right-hand and left-hand sides should be replaced concurrently |
| Hydraulic Upper Guide Bearing Assembly (2) | RPTS-1KEY9 | |
| Hydraulic Lower Guide Bearing (2) | RPTS-1KEY14 | |
| TS-2 Upper Guide Bearing (2) | RPTS-2CRA4 | |
| TS-2 Lower Guide Bearing (2) | RPTS-2CRA8 | |
| V-Belt | Order by Machine Serial Number | Different sizes of V-belts and pulleys have been used throughout production history. |
Maintenance Management Software
If building a dedicated preventive maintenance program for your testing equipment seems overwhelming, there's an app for that. In fact, an entire field of software applications is devoted to machine maintenance and upkeep. Comprehensive Maintenance Management Software (CMMS) applications make it easy to stay current with the maintenance, calibration, and repair of all your testing devices for lab and field operations.
We hope this article is a useful guide and reference tool to optimize the performance and service life of your Gilson Testing Screen. For your most difficult issues, please contact our knowledgeable and experienced technical support and customer service staff.
Gilson Is Here to Help
Contact our testing experts for more information or to discuss your testing application.
Testing Resources
Standard Test Methods, Specifications, and Practices
Individual test methods and specifications referenced in our product descriptions, blog articles, and videos are available for review or purchase from the professional organizations noted.
- ASTM International (American Society for Testing and Materials)
- AASHTO (American Association of State Highway and Transportation Officials)
- ACI (American Concrete Institute)
- State DOTs (Departments of Transportation)
- ISO (International Organization for Standardization)
- BS (British Standards)
- EN (European Standards)