Concrete Slump Testing: Test Methods, Equipment, and Testing Techniques
Concrete slump testing is far and away the most common test performed on fresh concrete for any application. The slump test has been around a long time, but in 1918, concrete pioneer Duff Abrams standardized the method to evaluate the consistency or workability of fresh concrete. He and other researchers found that maintaining the optimum slump value for a concrete mix facilitated the material's placement, consolidation, and finishing.
These days, the slump test is a significant factor when evaluating the compliance of a concrete batch to the approved mix design and an eleventh-hour check of its suitability for placement. The concrete slump approximates the ratio of water to cementitious materials (w/cm) in a particular batch and signals when the mix is out of balance.
The w/cm value is a critical factor in concrete strength development, but the direct correlation of slump and w/cm is not always a clear path. The standard ASTM C143 and AASHTO T119 test methods note that "Under field conditions, … such a strength relationship is not clearly and consistently shown."
Why is the Slump Test Important?
Concrete slump is one of a suite of fresh concrete tests that include air content, unit weight, temperature, and the molding of laboratory samples for strength tests specified in ASTM C94. These tests document the properties of the concrete as it is delivered to the job site. Fresh concrete tests are performed immediately before concrete placement and repeated periodically throughout the pour to document the consistency of the product.
In a previous blog article, we discussed workability of concrete and the various tests used to measure it. For this post, we will focus on just the slump test, how to perform it properly, and the best testing equipment to use.
What is Slump in Concrete?
Different concrete applications benefit from different slump values. Curbs or pavement installations with a slip-form paver require a stiff mix that holds its shape immediately after placement. Casting walls or columns with complex shapes and congested reinforcement calls for a mix that resists segregation but flows easily around reinforcing steel and into tight spaces.
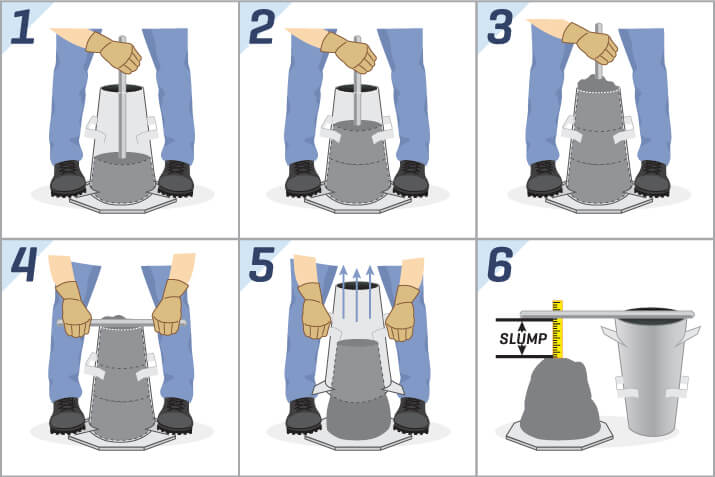
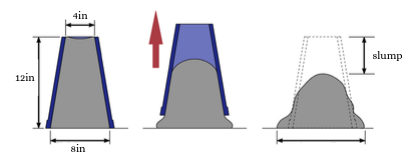
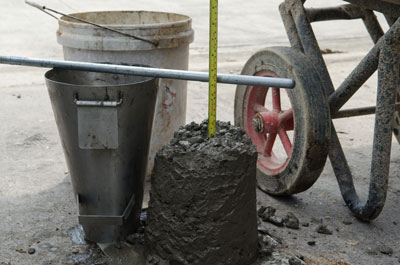
The concrete slump test starts with consolidating a sample of fresh concrete into a mold shaped as the frustrum of a cone. The concrete sample subsides or slumps when the mold is vertically raised since it is no longer supported. The vertical distance between the concrete's original and displaced top surface is measured in inches or millimeters and recorded as the slump value.
Concrete slump is a quick and easy test to perform correctly but is full of stumbling blocks that could produce inaccuracies. Improper testing might prevent the use of acceptable concrete or allow the placement of concrete that does not meet the specifications.
The slump of concrete changes continuously from the time the batch is mixed. Factors like aggregate size and shape, types of chemical admixtures, placement by pumping, temperatures, elapsed time after batching, and other external factors affect how a mix responds to the test.
Concrete slump values are also affected by the actions of individual operators performing the test. Minor variations in the specimen's placement or consolidation, or the speed at which the slump cone is lifted, can change the test outcome. The slump test is a hands-on procedure, and small variations in technique can affect its accuracy and repeatability.
Not All Mixes Respond Well to the Slump Test: What you Need to Know
ASTM C143 and AASHTO T 119 are the standard test methods for the slump of hydraulic-cement concrete with a maximum aggregate size of 1-1/2in (37.5mm). Coarser mixtures are unsuitable for slump tests but can be modified by sieving out aggregate retained on the 1-1/2 following ASTM C172.
Self-consolidating concrete (SCC) is designed to flow around congested reinforcing steel and consolidate well in complex formwork. Standard slump tests on these mixes yield very high measurements and are not helpful for characterization. ASTM C1611 and C1621 tests use a modified slump cone and different testing equipment to measure slump flow and passing ability of SCC, as explained in this blog article What is Workability of Concrete.
Slump tests for some specialized concrete mixes that incorporate high-range water-reducing admixtures (superplasticizers) or unusual combinations of aggregate sizes and volumes may need to be interpreted differently or not used at all.
Concrete Slump Testing Equipment: Putting Together Your Toolkit
Apparatus meeting the requirements for slump testing is widely available and affordable. The equipment is simple and easy to maintain but eventually must be replaced when damaged by dents, corrosion, and build-up of concrete residue. Concrete slump test kits made up of essential components are available for convenience.
Slump cones are traditionally made from seamless metal formed by a spinning process into the proper truncated cone shape. ABS plastic slump cones are also permissible and feature several advantages: They are lighter, sturdier, and resist dents and other deformations while remaining rust-free. Separate models meet either inch or metric unit of measure requirements.
Base plates are optional and make the test easier to perform and produce more consistent results. The plate itself forms a ready-made, non-absorbent flat surface with integral clamps that secure the foot tabs of the slump cone, allowing freedom of movement.
Tamping rods comply with test standards and feature the correct diameter with a hemispherical tip for proper sample consolidation. Each rod has enough length to ensure the required penetration during rodding.
Sample scoops should be a manageable size that allows even sample distribution with enough capacity to minimize repeated sampling of fresh concrete.
Measuring devices are typically tape measures, but rulers with a minimum length of 12in (305mm) and 1/4in (5mm) or finer graduations are also acceptable. Some tamping rods feature an engraved scale for measuring slump.
Performing the Perfect Slump Test: Representative Samples are the Key
Accurate test results are not possible without an accurate sample. ASTM C172 lays out the accepted methods for obtaining a representative sample of fresh concrete for tests, including slump, air content, unit weight, temperature, and the molding of strength specimens.
For revolving drum truck mixers and paving mixers, two or more portions are collected from the middle portion of the batch within a 15-minute period during discharge and combined into a composite sample. Alternate procedures are noted in the test method for sampling from other types of paving mixers, agitators, and open containers. Some projects may call for point-of-placement sampling, such as sampling from the discharge end of a concrete pump or from a concrete bucket.
Once the composite sample is complete, the clock starts ticking. Tests for the slump, air content, and temperature must be started within 5 minutes of sampling. The slump test itself must be completed within an elapsed time of 2 ½ minutes. This limited time frame makes it necessary to have the slump testing equipment set up and ready to use in advance.
A flat, level, non-absorbent surface, free of vibration and large enough to contain the slumped concrete, is required to place the slump cone. The cone must be damp but with no excess water and secured to the surface or base plate, either by standing on the foot tabs or by clamping to a base plate.
Pro Tip:Standing on the foot tabs throughout the test can be awkward. The test method permits clamping the cone to a non-absorbent base plate instead of standing on the foot tabs. This option is recommended for efficiency and convenience.
Step-By-Step Slump Test Procedure Follow the Test Method for Consistent Results
Scoop: The mold is filled with three layers of equal volume, not depth. The cone's depths of equal sample volumes work out to 2 5/8in (70mm) for the first layer and 6 1/8in (160mm) for the second layer. When placing concrete in the cone, move the scoop around the opening to evenly distribute the sample. The final layer is heaped over the top, with more added during rodding if needed.
Pro Tip:Save time and guesswork by marking the outside of the slump cone with the required depths of the first and second layers of concrete.
Consolidate: Using a tamping rod with the specified dimensions and shape is critical to the test's success. Attempting to use a rebar or other item that does not have a hemispherical tip pushes down aggregate particles instead of uniformly consolidating the concrete. A too-short rod is difficult to grasp and may prevent layers from being rodded to the proper depth.
Consolidate each layer with twenty-five evenly distributed strokes throughout its depth. Penetrate the bottom layer without forcefully striking the baseplate or surface. For subsequent layers, allow the rod to penetrate about 1in (25mm) into the layer below. The vertical strokes of the tamping rod must be angled slightly at first to ensure even consolidation around the perimeter of the bottom layer. Continue spiraling toward the center with evenly distributed vertical strokes.
Pro Tip:Never tap the cone to consolidate the sample in the same way that strength cylinders or beams are molded. If the slump cone is tapped, moved, or disturbed during the test, the sample must be discarded, and the test starts over with a new sample.
Strike-Off: After the rodding is completed, use only the tamping rod to strike off the concrete, flush with the top of the cone. A horizontal screeding motion combined with a rolling action of the rod provides a clean strike-off without compacting the sample.
Lift: While holding the cone down by one of the handles, use the other hand to clean away excess concrete from the base of the cone. Remove your foot from the opposite foot tab or release the clamping mechanism. Keeping the cone immobile while switching hands, repeat the process on the second side. With a hand on each handle, carefully lift the cone straight up without twisting. The vertical lift should be completed in 5 ±2 seconds.When the slump cone is removed, the unsupported concrete sample slumps.When the slump cone is removed, the unsupported concrete sample slumps.
Measure: After the slump cone is removed, the concrete subsides, or in some high-slump mixtures, collapses. Measurement to the nearest 1/4in (5mm) of the vertical difference between the top of the mold and the displaced center of the top of the specimen determines the slump value. If a portion of the specimen shears away, the test must be disregarded, and another test performed using a new sample.Measure slump by inverting the slump cone and using the tamping rod as a reference.
Compare & Report: The acceptable tolerances of the concrete slump are specified in the project specifications or as part of the concrete mix design. Slump test values that deviate from project requirements should be reported to stakeholders immediately and noted in inspection and testing reports.
The chart below shows different ranges of slump test values and how they might be used.
Concrete Slump Range
Slump, in (mm)
Degree of Workability
Application
0–1 (0–25)
Very low
Very dry mixes in slip forms or paving machines with high-powered vibration
1–2 (25–50)
Low
Low-workability mixes used for foundations with light reinforcement; Pavements consolidated by hand-operated vibration
2–4 (50–100)
Medium
Medium workability mixes for manually consolidated flat slabs. Normal reinforced concrete manually placed; heavily reinforced sections with mechanical vibration.
4–7 (100–175)
High
High workability concrete for sections with congested reinforcement; May not respond well to vibration.
Take a Closer Look: Using Knowledge and Experience to Add Value
Writing down the slump measurement on a testing report fulfills an obligation to perform the test method, but the concrete sample still has a story to tell. Collecting, testing, and examining fresh concrete early in the placement operation is a valuable opportunity to intervene if a problem is detected.
Understanding all the behavior of concrete once the cone is removed allows predictive troubleshooting. Learning to evaluate the appearance of a slumped concrete sample can be a powerful diagnostic tool. Potential problems can be detected and assessed at a point where something can still be done to correct them. A simple visual examination backed up by knowledge and experience can identify some significant issues.
If the concrete sample in a completed slump test has an unexpected response or appearance, the default action should be to discard it and rerun the test right away with a fresh replacement sample. The slump test is simple and fast, so a quick re-test should be the norm whenever there is doubt.
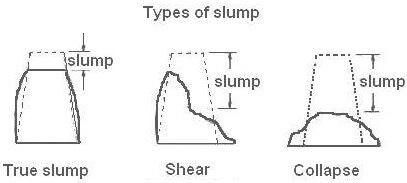
Typical profiles for completed slump test samples.
Types of Slump:
True Slump just kind of looks "normal." After the cone is removed, the concrete settles more or less straight downward and remains mostly intact. The sides bulge out, and the bottom may expand in diameter, but the center of the original top stays in pretty much the same orientation. Even as the concrete material shifts its position, the aggregate and paste constituents do not segregate very much.
These characteristics signal that the concrete mix proportions are fairly well-balanced and should behave predictably during placement, consolidation, and finishing. They also indicate that the mix is well-suited for slump testing. Some specialized concrete mixes with atypical proportions of aggregates, mortar, or admixtures may not respond well to slump tests and provide misleading results.
Shear Slump happens when a portion at the top of the sample shears off and falls away to the side. Although the distance between the original and slumped height is measurable, the separation of the sample makes the test meaningless, and it should be discarded. Shear slumps occur when a low paste content or high sand content causes a lack of plasticity in the mix.
Collapse Slump is when most of the sample fails to hold together after removing the slump cone. It can be an indicator that the sand-size content in the mix is too low, and the mix lacks cohesion.
Segregation is a particular problem that can potentially be diagnosed by observing the slump sample. The concrete aggregate and paste portions quickly separate when the cone is removed, showing little cohesion or plasticity. Signs of segregation could indicate issues with the coarse aggregate content, mixture proportions, inadequate mixing, or a test sample that was improperly collected.
Standard Test Methods, Specifications, and Practices
Individual test methods and specifications referenced in our product descriptions, blog articles, and videos are available for review or purchase from the professional organizations noted.